Artist Investigation
Reflection
Assignments
*Last reminders*
I will not sign your Yearbook checkout form unless you have:
1. taken all your work home with you (if you don't want something, please offer it to your parents or grandparents as they might really appreciate it or donate it to our school art collection)
2. cleaned out your art drawer completely.
3. taken down your activist art project/artist statement by May 27
4. filled out this anonymous feedback form about your experience in this class-LINK
May 16-19-LAST WEEK
Monday, May 23-Personal Tumblr Reflection Post-LAST thing due of the YEAR!
NOTE: I have removed the 3 habits of mind from the reflection...it's too much. If you already did it, no worries, I'll give you extra points. No need to do it if you haven't started yet!
On your final reflection on your own Tumblr page, include:
Final reflection WRITING:
NOTE: I have removed the 3 habits of mind from the reflection...it's too much. If you already did it, no worries, I'll give you extra points. No need to do it if you haven't started yet!
On your final reflection on your own Tumblr page, include:
Final reflection WRITING:
- Group's Artist Statement (you wrote this as a group)
- Individually, answer the questions below:
- Were you and your group able to meet all your SMART goals? If yes, explain what you all did well to ensure you stayed on track? If no, explain what unexpected challenge came up to deter you from meeting your SMART goals. I've included the SMART goals prezi below. Refer to your SMART goals on your epad. (if you finished your project by Wednesday with your artist statement to accompany it, you met your SMART goals!)
- What did you enjoy most about this unit and why?
- What did you find most challenging in this unit and why?
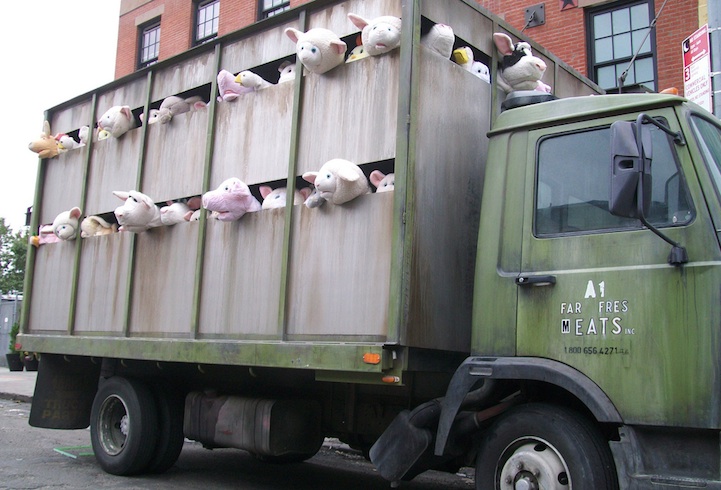
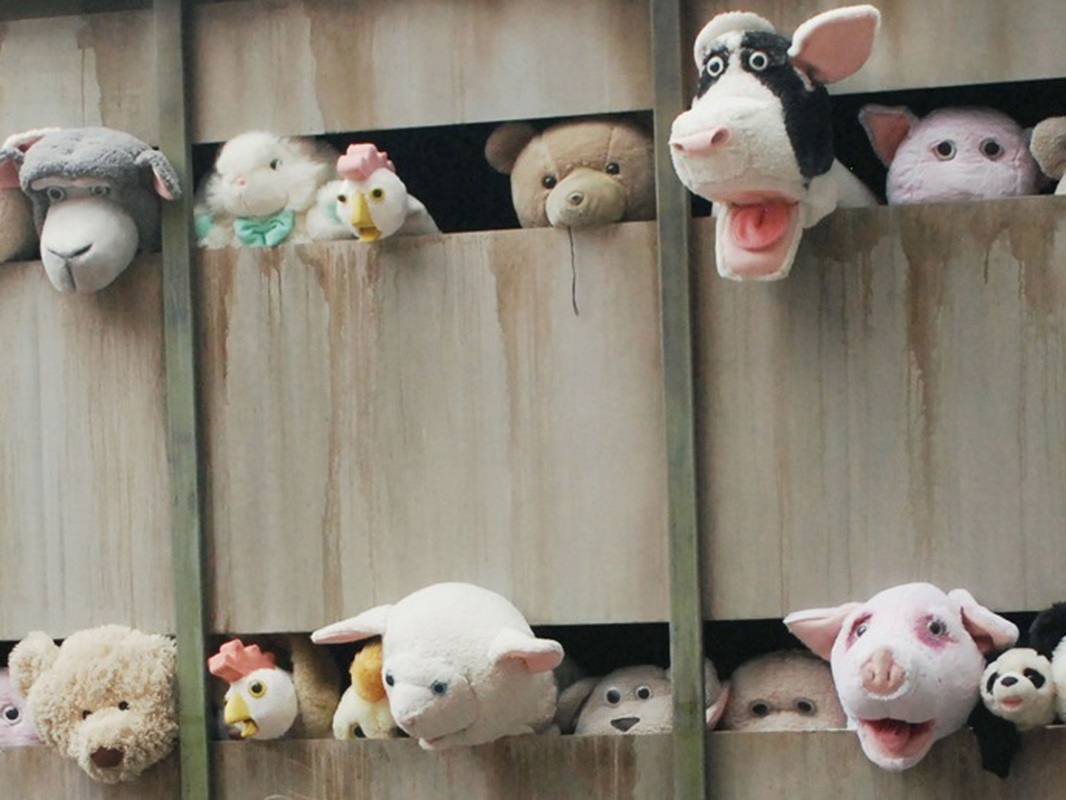
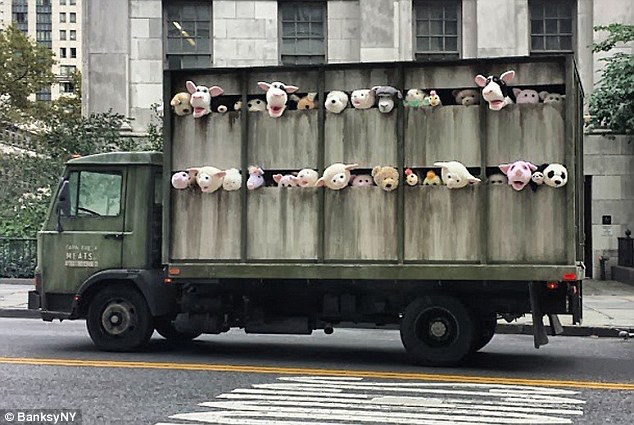
- 3 photos of your final artwork from different angles AND/OR video documentation of your piece if movement is something you want to show. EXAMPLE: Below are 3 photos of one of Banksy's NYC pieces shown at 3 angles with 1 of the photos as a close-up.
- 4-5 process photos that give insight into the making of your project. Include captions so we know what we are looking at.
|
Wednesday, May 18-Group Presentation and Critique of Project Make sure your artist statement is written up and printed out. Everyone in the group should be a part of writing this artist statement for your work. A copy of the Artist Statement should be on the group epad. Every group will fill out 1 rubric together and turn this in. Summative Rubric for Project-Group
Summative Rubric for Project-Independent
|
| ||||
May 9-13
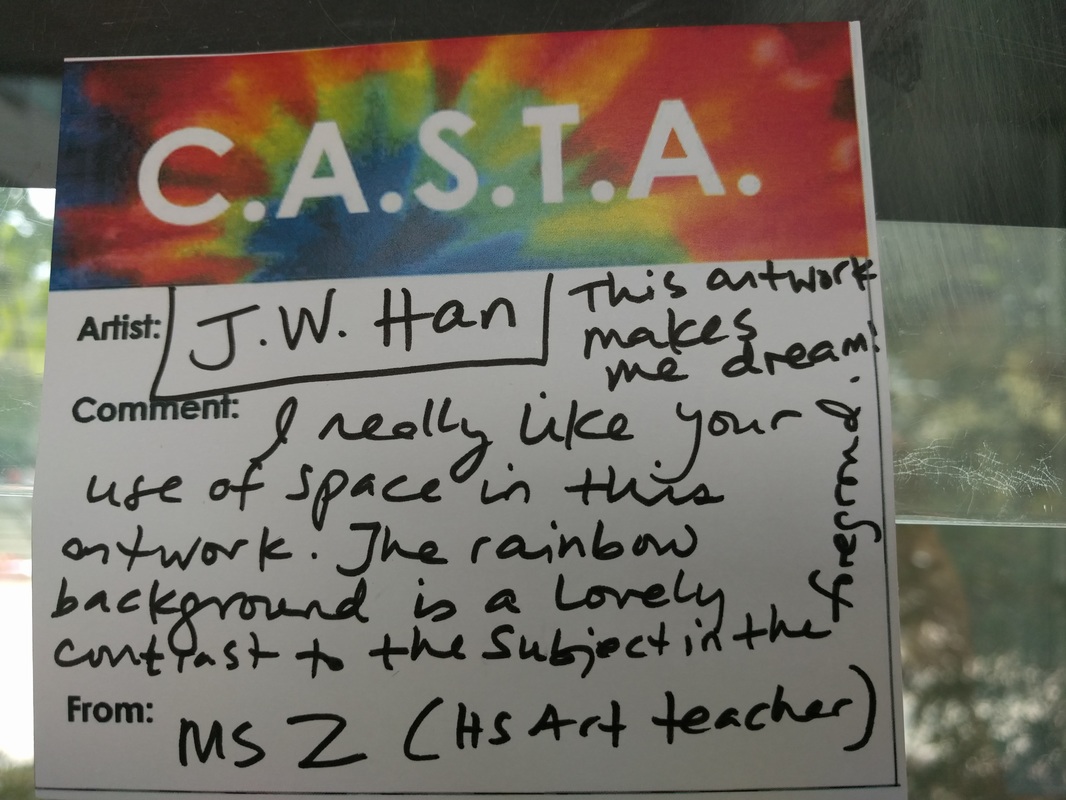
May 12-Thursday-CASTA feedback and turn in sketchbook
1. Bring your sketchbook in for assessment: Check the Activist Art page for details on the assignments posted below. I am checking for:
Make sure to write in a dark pen and bring some sticky tack or tape to stick your feedback card next to the artwork.
My example photos below:
1. Bring your sketchbook in for assessment: Check the Activist Art page for details on the assignments posted below. I am checking for:
- research on issue-2 articles
- artist investigation-2 artists (form,theme,context layout)-visuals and writing
- composition sketches
- final plan
- notes on public art,installation art, environmental art, sustainable art
Make sure to write in a dark pen and bring some sticky tack or tape to stick your feedback card next to the artwork.
My example photos below:
|
|
Homework for both class days:
- Take photos during class of your artwork that show the progress of the studio work as well as your team working together. By the end of the project, you should have 10 sharp photos demonstrating the progress, group work and visual planning (sketches and changes). With your group, figure out a way to share these photos with one another so each of you has a copy at the END of EACH PERIOD. Make sure to sketch/draw any changes and clarification to your final plan. These drawings can be used as 1 of the photos.
- on the EPAD-Take turns writing up a summary of what was accomplished during the class period, any slight changes to your final plan, steps moving forward, as well as how aligned your progress is to your SMART goals.
May 3-6
Due Wednesday, May 4 -Final Plan should be completed in your sketchbook
Final Plan: The final plan will be completed by each student in their sketchbook. It's important that each student in the group is 100 % on board and clear with how this plan will manifest. You may do your final plan together but everyone should have a copy in their sketchbook.
Visuals of the plan: You must each sketch out your piece from 3 angles: TOP VIEW, SIDE VIEW and FRONT VIEW and include color. Everyone must complete the visual component of the final plan, but you may all do the written component together as a group.
Information to be addressed in the written component of the final plan:
-TIME FRAME: Is this project doable in 3 weeks? Come up with a weekly plan in how you will pace your progress. Due date is May 18 (6 studio classes) The project must be set up on location with a brief artist statement to accompany the piece by May 18.
-MEANING/MESSAGE: How does this artwork express the chosen issue your group has decided to focus on?
How have you made the message metaphorical? Remember, the more literal your artwork, the less creative it is.
-MEDIA/MATERIALS-Does the art room/supply room have the supplies you will need? If not, how will you procure the necessary supplies on your own?
-PUBLIC SITE: Where is the site for this work on campus? You will need permission and approval to create this work from Mr Munro and Mr Quint. If this piece is outside, how will it withstand the elements?
-STEPS: Moving forward, write down the steps you need to take to realize this project.
-Optional: PARTICIPATORY: Will your audience be invited to participate/interact with your work? If so, how?
April 25-29
Due Thursday, April 28-1 page in sketchbook summarizing at least 2 articles on your chosen issue IN YOUR OWN WORDS. Your page must begin with a personalized explanation:
- WHY you are choosing this issue as the inspiration for your art project
- WHAT is the personal connection or personal investment your have to this topic
- WHAT are the most pertinent aspects of this issue, in your opinion
Make sure to include some images and CITE ALL YOUR SOURCES of information
Please look at the Activist Art unit page for more details-LINK
Due Tuesday, April 26-2 Artist Investigations (1 page for each artist) following the FORM/THEME/CONTEXT layout
Please look at the Activist Art unit page for more details-LINK
Please look at the Activist Art unit page for more details-LINK
April 18-22
Due Wednesday, April 20-Banksy Reflection post on Tumblr
HBO's "Banksy does New York" documentary
Go to Student-Teacher workfolder< Z_HSART<ART 1 and COPY the Banksy documentary video file to your laptop. You will need to watch this video for homework before finishing the Tumblr post on Banksy.
Your Tumblr post should be written in paragraph format.
The post should begin with an introduction about Banksy (context). Who is he? Where is he from? What was his "break" as a street artist and an artist in general? What is his work about and what ideas/issues frequently show up in his work?
Questions: (Answer at least 3 questions: you must answer #4, and then you may choose 2 other questions to answer from the list below to make up the rest of your post)
1. Is Banksy an artist, a vandal or both? Explain your answer with a detailed explanation on your stance.
2. What makes Banksy and his art unique? What is different about how he approaches making and showing art than the typical artist? Why is this interesting to you?
3. How does his artist residency in NY change over time? How does the public and social media affect his art? What do people's reactions to the artwork say about human nature?
4. Choose 1 artwork from his residency to analyze. What social, environmental or political issue does he reference in the chosen artwork. Why do you say that? How did he express this issue visually? Give us some details. Find an image of this chosen artwork and it should be the image used in your tumblr post.
5. Write down 3 open-ended questions you would ask Banksy if you could meet him. Why would you want to know these things? (Who are you and what is your name are not valid questions-try to be more creative and thoughtful than that!)
6. How has Banksy's work changed your view on the power of art, and the role of the audience? Explain your answer.
March 21-25
Final Reflection is due on Friday, uploaded as a Tumblr post
The presentation below goes in depth with everything so please use it as a resource!
Writing requirements-Should include a written response to these prompts
-Introduce the project
-Summarize the process
-Effort and Artistic growth
-The intangible aspect about yourself
You will choose 3 of the 8 traits listed below and state how you engaged with this in this unit. Evidence must be stated in writing and in an image.
You may EMBED these traits when addressing the reflection prompts or address them separately before or after your reflection.
Write in paragraph format to keep your writing organized. About 4-6 sentences for EACH reflection prompt. 4-6 sentences for each of the 3 chosen traits you want to focus on.
Make sure to underline or bold the trait you have chosen to discuss so it's easy to see you've addressed it.
Photo requirements-
-4 process photos-showing the different stages of your work
-3 images to evidence your 3 chosen traits
Length:
-No more than 1 full page. Try to be detailed but concise in your writing.
WEDNESDAY-March 23-Final Studio Project due with Rubric (attached below)
MONDAY, March 21-Turn in Sketchbook with Sketchbook checklist and sign the turn in sheet for your class so I know you've submitted your work.
Late work will not be graded for Q3.
Sketchbook Checklist:
| art1portrait_sketchbook_checklist.pdf |
March 14-18
This is the LAST WEEK for studio work during classtime.
Studio Work Rubric:
Studio Work Rubric:
| unit_4-selfportrait_studio_final.pdf |
Feb 29-March 4
From the beginning to the end of the project:
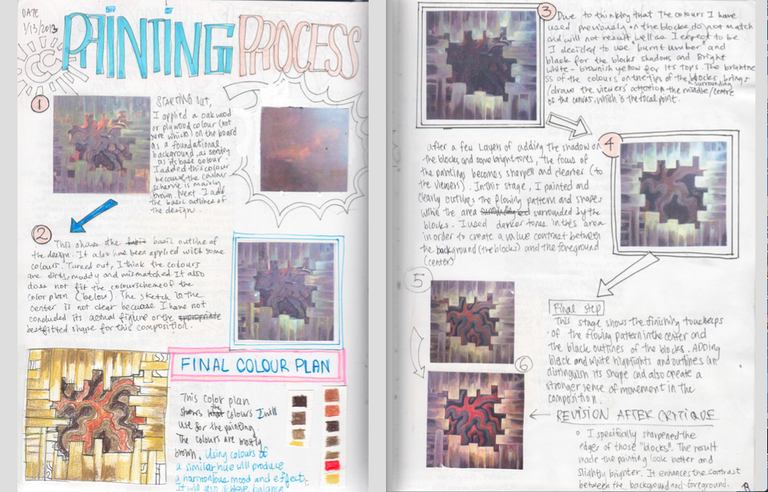
DOCUMENTATION of the PROCESS
You should take a photo of your painting every single class. This is a way to share the process with an audience and also to keep track of how your project manifested into what it ends up being.
Below is an example of process documentation in the sketchbook, but of an abstract painting project.
It gives you an idea of how this project manifested into the final piece. You will use this process documentation to help you with your final reflection.
A photo every single class period! Don't forget!
Monday, Feb 29-Tumblr post including:
1. Collage photo of critique sheet and final plan
2. Reflection on Critical Friends critique
How to make a collage-Take 2 photos (1 of your crit sheet and 1 of your final plan) and combine them using a photo program online. I use Picmonkey and Fotor...both are free for making collages. You can also use any photo editing program on your laptop as well.
Make your collage with photos side by side.
Upload this photo onto Tumblr and this photo collage post should be accompanied by a brief reflection. Address the prompts below:
1. Our critique goals were:
2. In terms of the structure and steps of the critique, did you find that it was a helpful experience? Did you feel that you were able to think through your steps of your project more thoroughly having to explain it to a group? Did other people's probing and clarifying questions help you think more deeply about your work? I'm curious to know your experience of the critique. Explain.
3. Are there any suggestions you would like to make about the sharing/critiquing experience to improve upon it? Please offer up some ideas or suggestions or strategies that have worked for you in other classes that may be helpful to employ.
1. Collage photo of critique sheet and final plan
2. Reflection on Critical Friends critique
How to make a collage-Take 2 photos (1 of your crit sheet and 1 of your final plan) and combine them using a photo program online. I use Picmonkey and Fotor...both are free for making collages. You can also use any photo editing program on your laptop as well.
Make your collage with photos side by side.
Upload this photo onto Tumblr and this photo collage post should be accompanied by a brief reflection. Address the prompts below:
1. Our critique goals were:
- everyone will come away with deeper clarity about their final plan and the direction they will take their project
- everyone will receive both warm and cool feedback
- every single group member will verbally participate at each of the verbal steps
2. In terms of the structure and steps of the critique, did you find that it was a helpful experience? Did you feel that you were able to think through your steps of your project more thoroughly having to explain it to a group? Did other people's probing and clarifying questions help you think more deeply about your work? I'm curious to know your experience of the critique. Explain.
3. Are there any suggestions you would like to make about the sharing/critiquing experience to improve upon it? Please offer up some ideas or suggestions or strategies that have worked for you in other classes that may be helpful to employ.
Feb 15-19
Photoshop Tutorial-If you need to blow up an image in photoshop and separate it into multiple panels (to paste on canvas)
Tuesday, Feb 23-Photos of media studies and short reflections uploaded onto Tumblr (changed to Feb 23 for students still finishing their studies)
TUMBLR photo upload-2 posts
-Take a sharp photo of EACH of your media self portrait studies and upload your cropped and straightened images onto your Tumblr page
EACH photo should be it's own tumblr post and accompanied by a short written statement underneath the photo.
The post should be titled accordingly-Example: Acrylic Collaged Self-Portrait
Under EACH Media Study photo, address the prompts below in complete sentences.
1. What was the challenge? Explain the media you used as well as the art techniques and skills you had to practice in this media study.
2. Why were you asked to do this assignment?
3. What did you learn from doing this?
4. What would you have done differently if you could do it again?
5. Were you challenged in this assignment? Why or why not? How have your art skills improved or broadened after this assignment?
On Wednesday in class, you were given a checklist to go through for your final plan. Make sure you have this glued into your sketchbook so you are ready for the critique on Friday, Feb 19.
Wednesday, Feb 17-Final Plan due
A final plan in your sketchbook should be finished. You will have Monday class time to work on it.
The Final Plan should include:
VISUALS:
-The final composition, in color (half an A4 page-the example below is a bit too small so make your final composition bigger)
-Map out your color scheme (this may be inspired by your artist inspiration) or informed by the mood you want to exude.
-Adobe Kuler site (to help you plan out your color scheme)
WRITTEN:
-What intangible aspects about you are you expressing in this self-portrait? What visual qualities will you use to express this?
-What is your current 6 word memoir? How has this informed the visual plan for your work?
-Who is your artist inspiration? (you can have more than 1) How has this artist's style inspired your project? Be explicit.
https://www.pinterest.com/aimeezart/figurative-and-portraits/
-What media will you work in? What will your layout be (multiple small pieces or 1 large piece)?
-What are your planned steps to manifest this idea? Write down your steps.
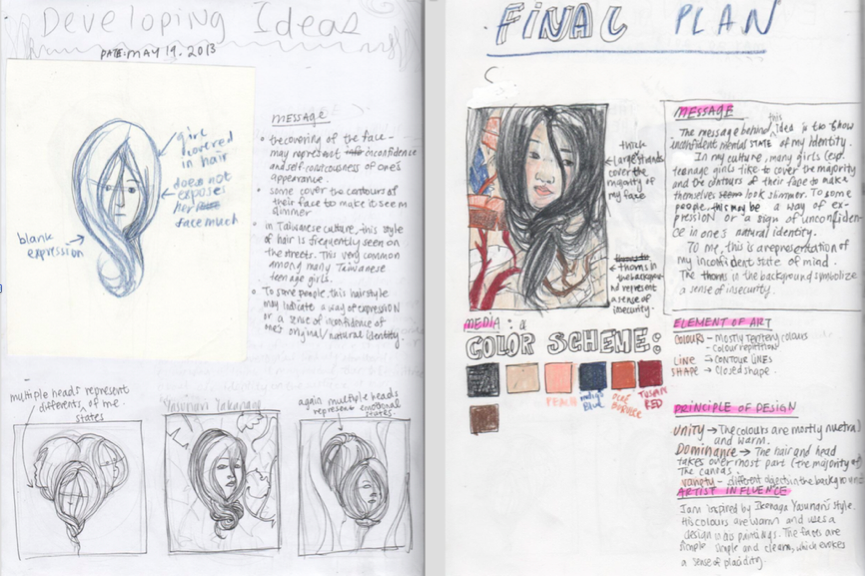
Below is an example of composition sketches on the left and a final plan on the right. Notice the balance of WORD and IMAGE.
Chinese New Year Holiday
|
HW for holiday-2 assignments
1. Finish your list (example on right) of what intanglible things you want to incorporate into your final project (making connections between meaning and visual expression)-Work from your 6 word memoir! 1 page in sketchbook ~ roughly sketch out 3 composition ideas for your final project (5 minutes per sketch) When you come back from break, you will create your FINAL idea. 2. 1 page in sketchbook-Art exhibition/Gallery visit-visit a gallery/art exhibition with a friend or family member, if you are here or in another city. Take a few photos of the show and write up the answers to the questions below. Where is the art show? Who is the artist(s)? Where are they from? What media do they work in? Describe the work. What's the theme or message about their work exhibited? What intangible qualities are being expressed? How did they use media to express these qualities? Overall, what's your impression of the work? Do you like it or not? Explain your answer. *If you cannot finish this gallery/art exhibit visit during the holiday, then you will need to get this done before the end of the portrait unit, which will be after the first week in March. If you are in Beijing, here are some ideas: -Parkview Green Mall Gallery -relevant to our portrait unit-Korean Artist Kang Hyung Koo -Red Gate Gallery-The next 25 years (a showcase of their main artists) -Pace Gallery-798 -Song Dong -Today Art Museum-Renault show Time Out Beijing-Art Section (this is where I check to find out about current shows in Beijing) |
Ms Z's example list
| ||
Feb 1-Feb 5
Both portrait studies (oil and acrylic collage) should be completed by Friday, Feb 5.
Jan 25-29
Wednesday, Jan 27-
Take your findings from our classwork on Monday and use those to craft "the story of you-right now" using the 6 word memoir
Six word Memoir examples:
1. What's six?
2. 6 word memoirs from another HS
3. 6 word memoir Tumblr
Monday, Jan 25- In sketchbook
Ideaweb-10 ideas of your "unseen" self (more added after personality test)
1 page of Artist Investigation-choose 1 portrait artist from the list on the Portrait unit page and complete a mini artist investigation on them and their work (mini because it's 1 page rather than 2).
Remember, 2 components:
- the visual (printed images of artwork and a visual study)
- the written (intro of artist, their work, and your response).
Jan 18-22
|
Thursday, Jan 21 :
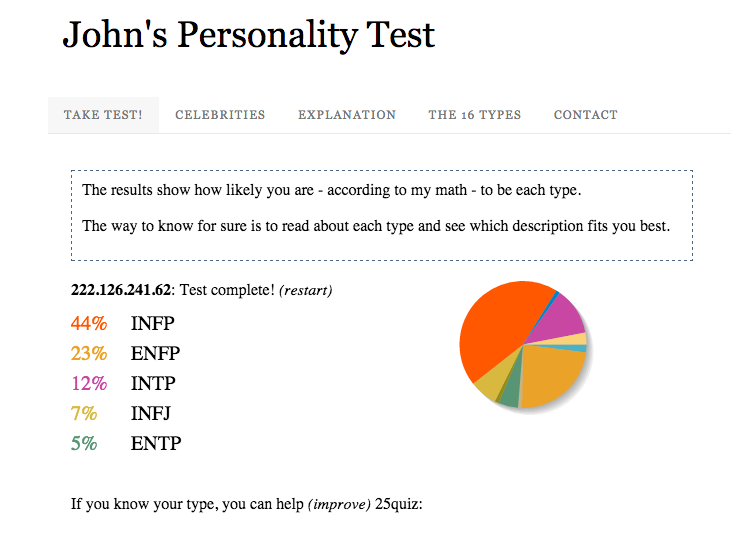
Screenshot of quiz result and short written response to questions below-glue into sketchbook. Choose 1 personality test to take. When you are done with the test, take a SCREENSHOT to print out. You can see my example on the right. I took the 3rd test on the list. I am an INFP, which means "Introverted, Intuitive, Feeling, Perceiving" and in order to understand all that, I need to read the long explanation about my personality type. You need to include a WRITTEN RESPONSE to this result:
Taking a personality test will help you understand your complex self a little more, which I believe is what creating a self portrait also does in a visual sense. My hope is that this personality test will bring about more insight into who you are as a person and what makes you tick, and perhaps you could use some of this awareness about yourself and visualize it in some way in your project. Below are some personality test options: 1. 16 personalities 2. Jung Typology Test 3. John's personality test-based on Myer's Briggs |
|
Jan 13-15
Friday:
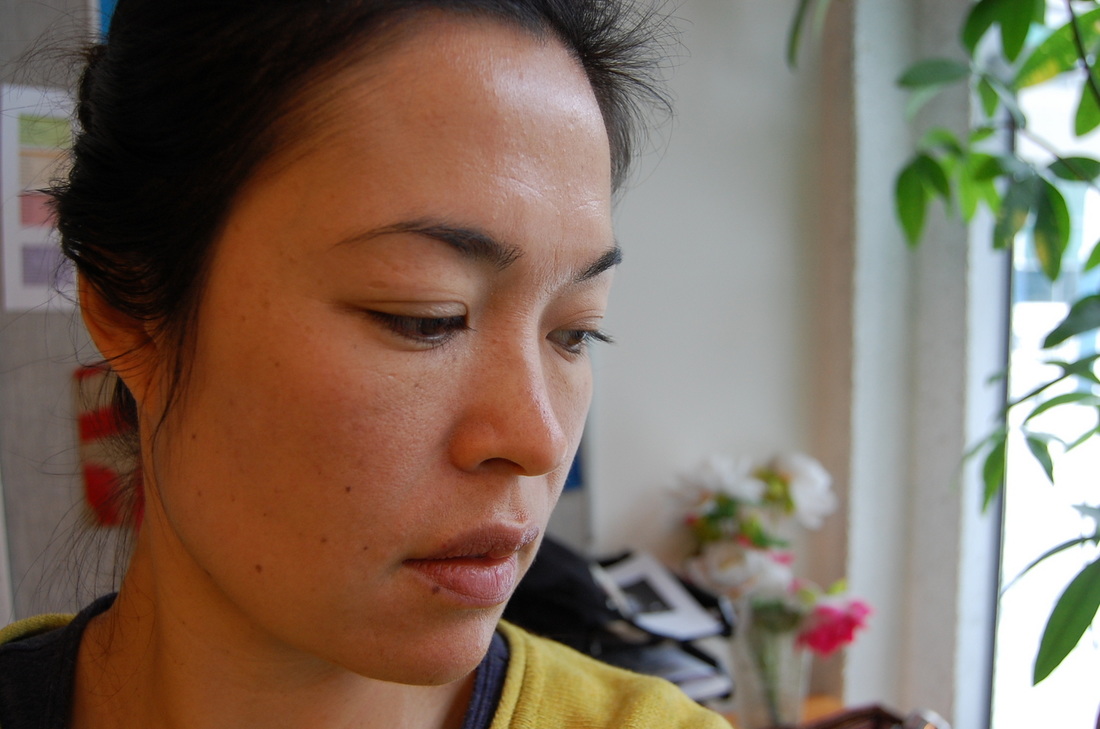
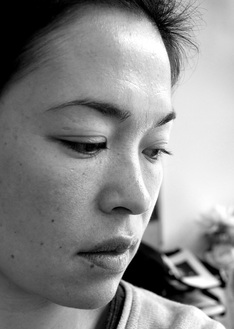
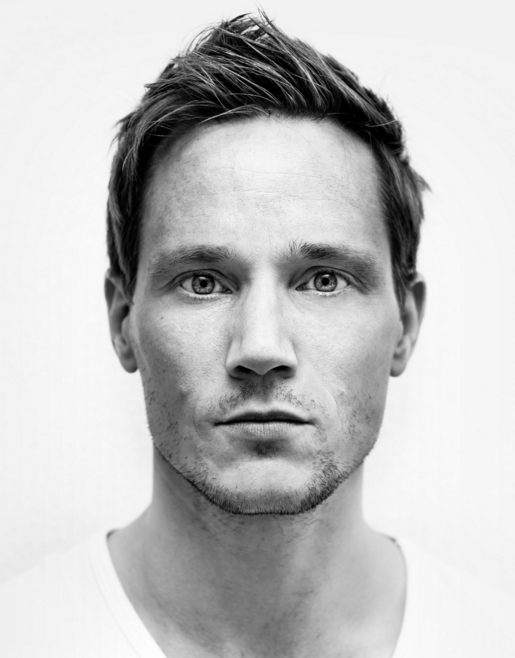
Choose 2 photos of yourself to print A4 size-Black and White-Full page
You can do the editing necessary on the Photos program installed on your macbook, or on Picasa, which is what I use.
Below is my before photo and my after photo (I cropped it smaller, made it black and white and increased the contrast).
You can see how the adjusted black and white image helps bring out the values as well as accentuates the contrast between the highlights and shadows. Also, the way that I cropped my photo will help me as I am using an A4 piece of cardboard for my monochromatic oil painting portrait study.
|
|
Monday: First day back!
1. A look back at 2015
http://www.nytimes.com/interactive/2015/12/27/sunday-review/2015-year-in-pictures.html
http://edition.cnn.com/2015/12/03/world/gallery/year-in-pictures-2015/
With a partner, spend some time looking through the photos.
Find 3 photos that "grab" you in some way:
-either by the COMPOSITION of the actual photo
-the STORY behind the photo
-the CONNECTION to the photo because you remember when it happened in the year
CHOOSE 1 favorite out of your 3 to upload to our class padlet
Support your choice with a personalized response underneath your chosen photo and sign your name
A4 class: http://padlet.com/wall/ehclbwa41fox
A1 class: http://padlet.com/wall/gryxa2l8x6tm
2. Portrait videos- write down 1 thing you heard or saw that stood out to you from the short videos of Alex Katz, Andrew Salgado and Max Gasparini.
3. Self Portrait Brainstorm-What is the intangible "unseen" in you or about you? Make an idea web- At least 5 ideas
December 14-17-Exam Week-Important Reminders
Due Wednesday, December 16-3 sketchbook assignment photos and short reflections & Photo of Completed Color Wheel Mandala with final reflection
All Color Wheel Mandalas Due on Wednesday at 4:15pm! Make sure you fill the Color mandala rubric and place it in your class folder in the classroom.
TUMBLR
*3 sketchbook assignments you completed in Q2
On your Tumblr, post 3 photos of sketchbook assignments you feel most proud of that you've created in Q2.
Clear photos of your sketchbook pages should be edited properly before getting posted (cropped, straightened, adjusted exposure if necessary)
Add a short description underneath each sketchbook assignment photo post addressing questions below:
-What was the challenge?
-Why are you proud of it?
-How does it show growth or improvement in your creative thinking/artistic skills?
*Photo of Completed Color Wheel with Accompanying Reflection
The LAST person in the group to finish is responsible to TAKE a clear and well lit top view photo of the color wheel mandala and email this photo to the rest of the group members.
A completed color wheel should have all slices painted in and the background painted black. Each group member is responsible to paint their background black section.
Reflection Question prompts for your Color Wheel Mandala
Post an edited photo (cropped, contrast, exposure) of the completed group mandala accompanied by a written reflection using the question prompts below.
-What was the challenge? Mention any pertinent Principles of Design that apply to this challenge (hint: balance, pattern, contrast)
-Why are you learning how to do this? How might this help you be a better artist?
-Summarize the steps in this group challenge.
-Groupwork:
What was your experience like working with a group?
Overall, did you feel that working in a team made it easier for you to be successful? Why or why not?
Was the challenge easier to do it with a group?
Do you have any new understandings or realizations about groupwork? What works, what doesn't? Explain.
In your opinion, are you are a valuable team member who contributed to your group's success? Why or why not?
-Individual learning:
-Name the hues of the 3-4 slices you were responsible in painting.
In terms of your own 3-4 slices, what new things did you learn or do you understand more deeply now?
Any noticeable improvements, like color mixing, more brush control etc.
What do you still find challenging or difficult?
What new art/design ideas did this color wheel mandala give you? Please explain.
Below is a list of what you should have posted on your Tumblr:
Each tumblr photo post should be supported by a brief summary of what you are posting.
1. Photo of Painted Slice (all of you have this photo already that you turned in for voting)
2. Photo of Color Sampler
3. Photo of Color Scheme Study
4. Photos of 3 Sketchbook Assignments you are proud of that you completed in Q2 (details above)
December 7-10
|
Sketchbook Submission on Wednesday, DECEMBER 9
Below is a list of the assignments you should have in your Sketchbook: 1. Color Notes from presentation with some color illustrations 2. Print out of art analysis of 2 mandalas 3. 3 rough sketches for mandala slice design 4. Print out of group color analysis of 3 portraits 5. GRID drawing Self-portrait 6. Contact sheet of self portrait photos-10 (we will refer to these next semester) 7. Upside down drawing of Art 1 classmate 8. Made up Face following facial proportions 9. Color portrait of a friend OR family member |
Due Monday, December 7-Last Sketchbook Assignment of the Semester
Color Grid portrait of a friend or family member
Thanks to Andrew for this excellent assignment idea combining color AND portrait practice :)
I'd suggest sticking with pencil if you are still learning how to draw faces and add values. If you are advanced with this, you may use watercolor or pen.
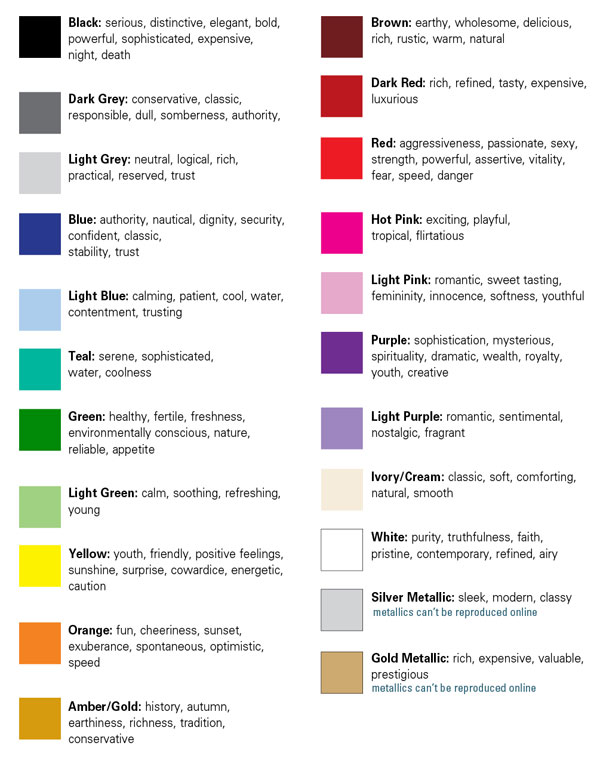
For this last assignment of the semester, you will choose a FRIEND OR a FAMILY MEMBER to draw/paint-at least half A4 size paper. This drawing/painting should include the use of COLOR to reflect this person's personality. Use the chart above or research color meanings to choose the colors that match or reflect this particular person's personality. I would limit to no more than 2 colors. Use a color scheme to guide you if you are using more than 1 color, like analogous or complementary.
If you are a beginner, just choose 1 color to use for this portrait (monochromatic color scheme).
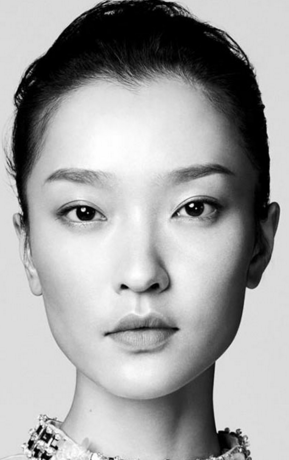
You will need to have a PHOTO of the person. Make it Black and White-this will be EASIER to draw from. Grid it on the laptop OR print it out and GRID it yourself. Use the Grid measurements similar to what you used for the self-portrait.
Color Grid portrait of a friend or family member
Thanks to Andrew for this excellent assignment idea combining color AND portrait practice :)
I'd suggest sticking with pencil if you are still learning how to draw faces and add values. If you are advanced with this, you may use watercolor or pen.
For this last assignment of the semester, you will choose a FRIEND OR a FAMILY MEMBER to draw/paint-at least half A4 size paper. This drawing/painting should include the use of COLOR to reflect this person's personality. Use the chart above or research color meanings to choose the colors that match or reflect this particular person's personality. I would limit to no more than 2 colors. Use a color scheme to guide you if you are using more than 1 color, like analogous or complementary.
If you are a beginner, just choose 1 color to use for this portrait (monochromatic color scheme).
You will need to have a PHOTO of the person. Make it Black and White-this will be EASIER to draw from. Grid it on the laptop OR print it out and GRID it yourself. Use the Grid measurements similar to what you used for the self-portrait.
Due Wednesday, December 9
Optional Assignment: ACAMIS Christmas Card Challenge
We are inviting all ACAMIS schools to participate by creating a design to enter into the challenge.
Here are the guidelines:
- Designs should be A4 size and no larger than 10 MB
- The acronym ACAMIS must appear in the design in some way
- Any medium is acceptable (paint, pencil, printmaking, digital, you name it!)
- A winter/holiday greeting should be incorporated into the design
- This is a design opportunity, not a competition (no designer names/initials, please)
- The ten best submissions will become part of an ACAMIS holiday greeting
- The remainder of submissions will be displayed in a design
folder on the ACAMIS website
- Have fun!
Please open this opportunity to all grade levels at your school. The art teachers will vote on the 1 design to represent ISB.
November 30-Dec 4
Tuesday, December 1
2 things: made up face AND Tumblr post of Color Sampler and Color Scheme Study
Tumblr post upload: Take a photo of your color sampler page AND your color scheme study page, then EDIT them (crop, straighten, exposure, etc). Post these 2 photos on your Tumblr page and add a paragraph description explaining what we are looking at and why you did these 2 pages. Please don't write: "-because it was an assignment." What new things have you learned about color theory? What are the big takeaways for you so far? What are you more aware of in terms of color vocabulary, color pairing, hue and value contrast etc.?
Made up face drawing:
Supplies: HB pencil, 2B pencil, ruler, eraser, sketchbook, tissue
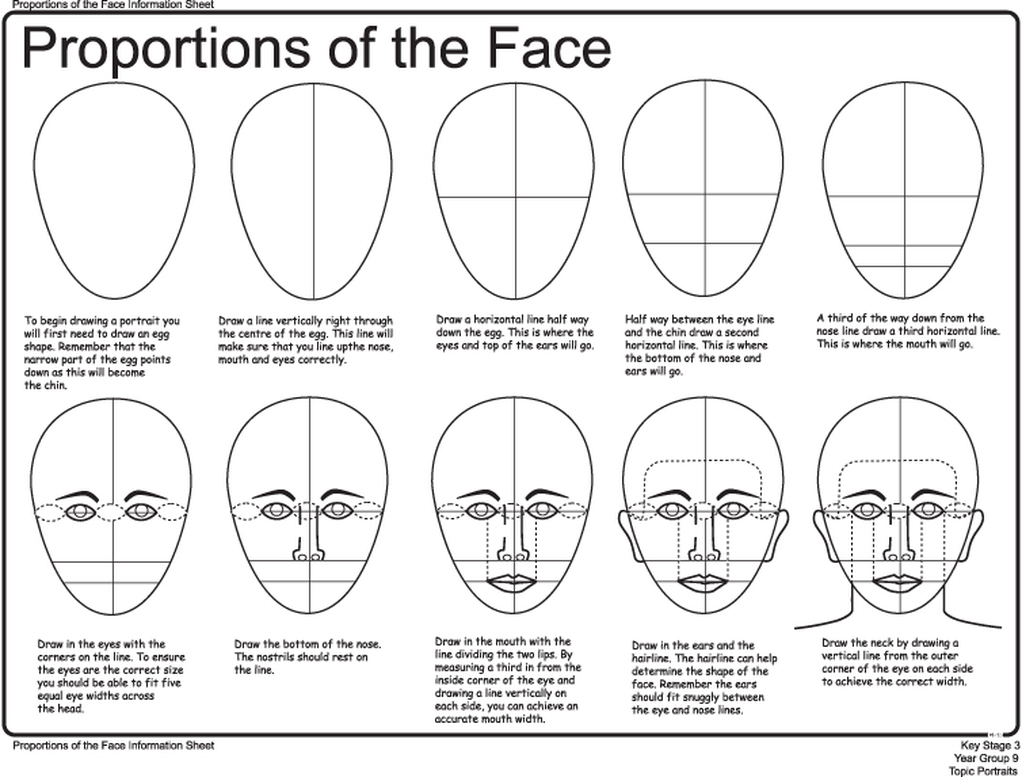
Drawing a make believe face following the sheet below on facial proportions. As you can see, I used a reference photo to help with the values on the face, even though the face I drew does not look like Taylor Swift.
Use an HB and 2B pencil and press lightly. Look through the photos of my drawing below and follow the directions (captions on each of the photos).
Optional Assignment: ACAMIS Christmas Card Challenge
We are inviting all ACAMIS schools to participate by creating a design to enter into the challenge.
Here are the guidelines:
- Designs should be A4 size and no larger than 10 MB
- The acronym ACAMIS must appear in the design in some way
- Any medium is acceptable (paint, pencil, printmaking, digital, you name it!)
- A winter/holiday greeting should be incorporated into the design
- This is a design opportunity, not a competition (no designer names/initials, please)
- The ten best submissions will become part of an ACAMIS holiday greeting
- The remainder of submissions will be displayed in a design
folder on the ACAMIS website
- Have fun!
Please open this opportunity to all grade levels at your school. The art teachers will vote on the 1 design to represent ISB.
November 30-Dec 4
Tuesday, December 1
2 things: made up face AND Tumblr post of Color Sampler and Color Scheme Study
Tumblr post upload: Take a photo of your color sampler page AND your color scheme study page, then EDIT them (crop, straighten, exposure, etc). Post these 2 photos on your Tumblr page and add a paragraph description explaining what we are looking at and why you did these 2 pages. Please don't write: "-because it was an assignment." What new things have you learned about color theory? What are the big takeaways for you so far? What are you more aware of in terms of color vocabulary, color pairing, hue and value contrast etc.?
Made up face drawing:
Supplies: HB pencil, 2B pencil, ruler, eraser, sketchbook, tissue
Drawing a make believe face following the sheet below on facial proportions. As you can see, I used a reference photo to help with the values on the face, even though the face I drew does not look like Taylor Swift.
Use an HB and 2B pencil and press lightly. Look through the photos of my drawing below and follow the directions (captions on each of the photos).
|
|

|
November 23-27
Friday, November 27
2 things: voting and upside down drawing
Important: VOTING on your favorite 4 slices- Complete this by 10 am on Thursday morning.
You will need a VPN to access these links so do this at school if you don't have a VPN at home.
For each class, there are 2 links. You must open both of them.
A1 class
Flickr
Voting Form
A4 Class
Flickr
Voting Form
Friday, November 27
2 things: voting and upside down drawing
Important: VOTING on your favorite 4 slices- Complete this by 10 am on Thursday morning.
You will need a VPN to access these links so do this at school if you don't have a VPN at home.
For each class, there are 2 links. You must open both of them.
- The first link opens up a Flickr album where everyones photo is labeled with a number.
- The second link opens up the Google Form where you will vote on your favorite 4 slices. Select the same number labeled on the photo in the Flickr album.
A1 class
Flickr
Voting Form
A4 Class
Flickr
Voting Form
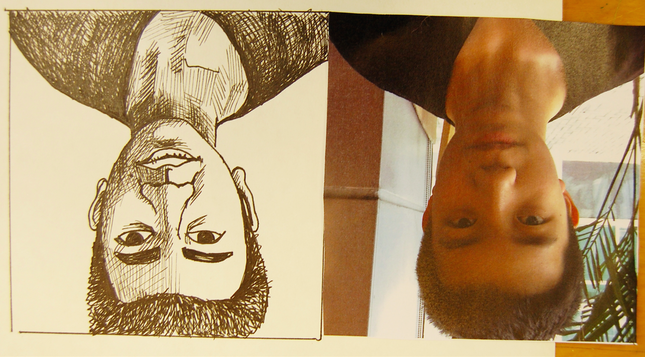
Finish your upside down drawing of a fellow ART 1 student that we started in class. Add values with cross-hatching with black pen, or if you prefer, you may add values shading with pencil.
Wednesday, November 25
Contact sheet of 10 self portraits of you (3 of my examples above)-EDITED (cropped, black and white, contrast and exposure adjusted)
-images should be on your laptop in a folder and 1 printed sheet for sketchbook
Check out the Portrait photographers for inspiration and pay attention to how they use:
- COMPOSITION (shapes within a frame-cropping)
- LIGHTING
- FACIAL EXPRESSION
- EYE CONTACT
- FACE ANGLE
Monday, November 23
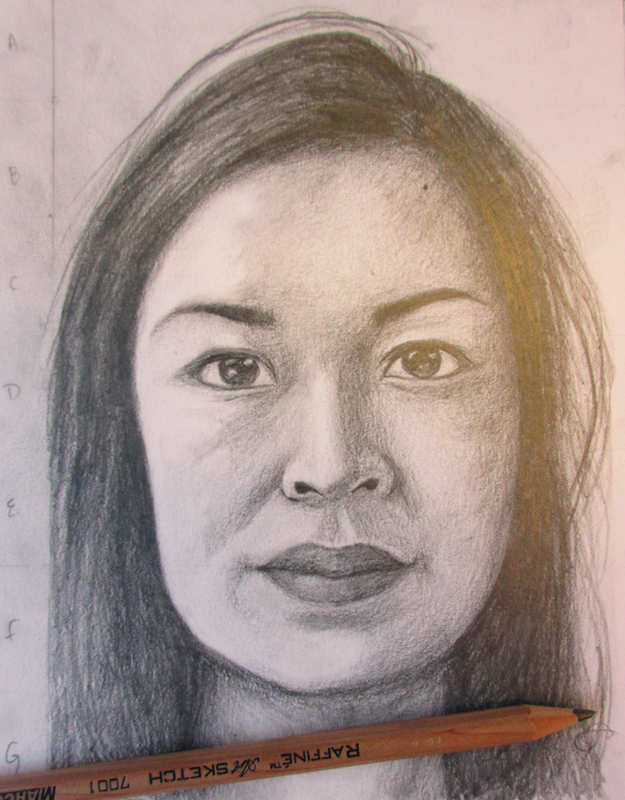
Grid portrait exercise
Pencil Portrait Inspiration: Check out the work of 21 year old illustrator, Marynn. Her portraits are done in pencil and then she adds colorful embellishments in Photoshop. She says, "My weapons are my 2B pencil and a cup of patience."
* If you really really dislike your photo, then you may take your own, but you will have to add a grid yourself and print it. It should be a straight view of your face with a light source from the left or right side.
Follow the steps below and try your best. This assignment should take about 1.5-2 hours if done well!
When you are finished, you can glue the photo next to your grid drawing.
For this assignment, you will need:
an HB pencil, a 2B pencil, an eraser, a sharpener, a tissue paper, ruler and your sketchbook
1. Use a ruler to draw out a grid outline in your sketchbook the same size as your photo.
Do this on half of an A4 sketchbook page so you have space later to glue your photo next to your drawing when it is done. Mark down the grid measurements on all sides of the outer rectangular edge to connect the grid lines.
2. Lightly use a sharp pencil and ruler to draw your grid lines. You will erase this later, so just make sure to keep your lines light!
3. Lightly draw the outlines to all major shapes (hair outline, face outline, eyebrow eye outline, nostrils, lips, any defining wrinkles). Be very light about your pencil lines. It's EASY to ADD but hard to TAKE AWAY!

4. After your outlines are done, it's time to erase your grid lines. You no longer need them now that you have your outlines. The photo above shows my outlines. I erased the grid lines right after taking the photo.
5. Once your grid lines are erased as best as you can, you can lightly shade your whole paper to give it a very light grey value.
6. In the photo below, you can see that I lightly shaded my entire paper, and then used a tissue to gently rub the graphite to evenly blend it over the paper. You should have a light grey value over the whole surface. We are "toning" the paper.

|
7. In the photo on the bottom left, I have been adding values for about 20 minutes. I am doing this very lightly with the side of my pencil. I'm about halfway done. As you can see, I am drawing my face upside down because it helps me see values and shapes for what they are. Try flipping your sketchbook and photo upside down for a while as you are shading and adding details.
8. Use the corner of your eraser as a drawing tool. As we are working on a grey tone, we will need to use the eraser to bring out the tints and highlights on the skin and features. 9. The bottom right photo shows my completed drawing. I have used the eraser to bring out the highlights and gone back over sections of the face to bring out the subtle values on the face to create more convincing form. I used a 2 B pencil most of the time and kept the pencil sharpened regularly. |

|
|
November 16-20
Thursday, November 19
Finish your final pie slice design and outline in black pen. You should have 3 small slice sketches and then develop your favorite into your final large design.
Use this mandala site OR this mandala site for help in designing your slice!
Reminders for the slice:
-only use a compass and a ruler
-no small shapes, so keep it simple
-think about your outer edge and the shape your mandala will create
-finish at home using mechanical pencil, and then go over in black pen
In class Thursday:
After outlining your mandala slice in black pen, photocopy it onto an A3 paper, and on that photocopy paper, you will paint out the range of values of any hue of your choosing. this will bring your slice design to life!
-Write your name on the original paper without color and give to Ms Z.
-Take a photo of your slice that has been painted, ADD your NAME in your file name and place it in your class folder on Student-Teacher Workgroups < Z_HS ART< ART 1< Class folder <Mandala Slice Design
--We will use the color photo for the class voting.
Tuesday, November 17
1. Add illustrations in colour to your Color Notes (from presentation from last Wednesday) For example, if you need to illustrate complementary colors, draw and color the 6 complementary pairs from the color wheel. Make it fun and creative for you!
2. Research 2 mandalas from different cultures (Tibetan, Indian, Aztec etc.) On 1 page in your sketchbook, you should print out 2 photos of these mandalas with your analysis. Directions on the Color Mandala page.
3. Sketch out 3 rough ideas for your mandala slice-No more than 5 minutes per sketch!!!! Time yourself. No small shapes.
4. Make sure your page on the 3 portraits and their color schemes has been added into your sketchbook.
November 9-13
Monday, November 9
Project Sign-printed on A4 paper -details below
Monday, November 9
Project Sign-printed on A4 paper -details below
|
Refer to the example PDF above to create a page (on Word, Pages, Photoshop) as your project sign.
--Project sign should include:
|
Important reminders: Many of you uploaded your video onto Youtube, which is great, but for the QR code to work on local Chinese internet, you must upload the GIF and the video file directly onto Tumblr. Each of the files much be uploaded on individual posts in order to generate a QR code properly.
Tumblr File size limits: GIF: 2 MB Video: 100 MB |
How to create a QR code
1. First make sure that your GIF and Video are uploaded onto your Tumblr site in SEPARATE posts.
2. Go to http://cli.im/
3. Copy the URL of your Tumblr post and paste it in the cli.im website
4. A QR code will be generated for your specific URL.
5. Download the QR code onto your desktop.
6. Do this 2 times (1 for GIF post, 1 for video post) so you will have 2 QR codes
November 2-5
Monday, November 2
-Final youtube video and GIF uploaded onto personal tumblr page
-Final reflection to accompany the videos on tumblr
---Final reflection prompts
Monday, November 2
-Final youtube video and GIF uploaded onto personal tumblr page
-Final reflection to accompany the videos on tumblr
---Final reflection prompts
October 25-29
Thursday, October 28
-Sketchbooks due with Self Assessment sheet filled out
Tuesday, October 26
-Have your 40 or more EDITED pages in imovie ready to show the class for a critique. You will have a week of NON-CLASS time to make adjustments to your photos/drawings to turn it in for a final submission/final grade.
-Illustrator of the Week-2 Butterfly pages
1/2 of a sketchbook page for a detailed visual study. You may do 2 small ones (1/4 page each) or 1 larger one. Up to you!
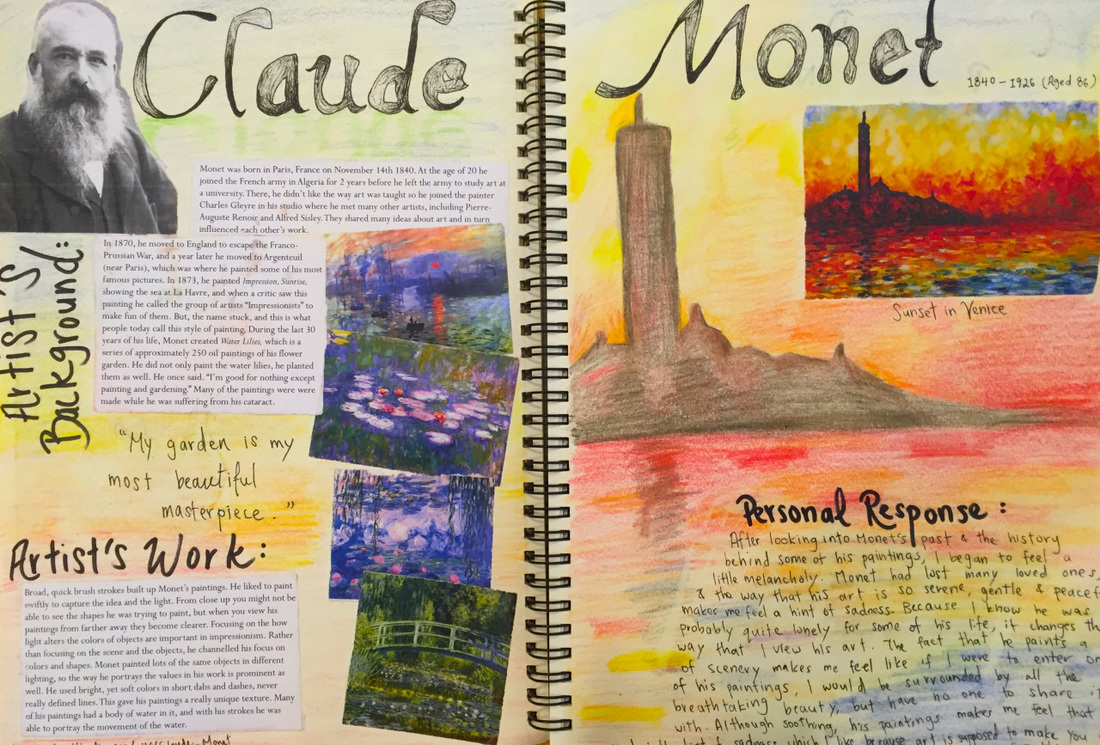
Remember, your writing should be in complete sentences and address 3 areas of their work: artist background, artist work, and personal response
This week, you can choose an up and coming illustrator to investigate from Colossol
OR
an illustrator we looked at in our illustration unit:
Yuko Shimizu
Shaun Tan
Molly Crabapple
Eric Drooker
Christoph Niemann
To find out some interesting background on your chosen illustrator, I would recommend googling, ''Artist name' interview' to find an interview about them.
Artist of the Week student examples below:
Thursday, October 28
-Sketchbooks due with Self Assessment sheet filled out
Tuesday, October 26
-Have your 40 or more EDITED pages in imovie ready to show the class for a critique. You will have a week of NON-CLASS time to make adjustments to your photos/drawings to turn it in for a final submission/final grade.
-Illustrator of the Week-2 Butterfly pages
1/2 of a sketchbook page for a detailed visual study. You may do 2 small ones (1/4 page each) or 1 larger one. Up to you!
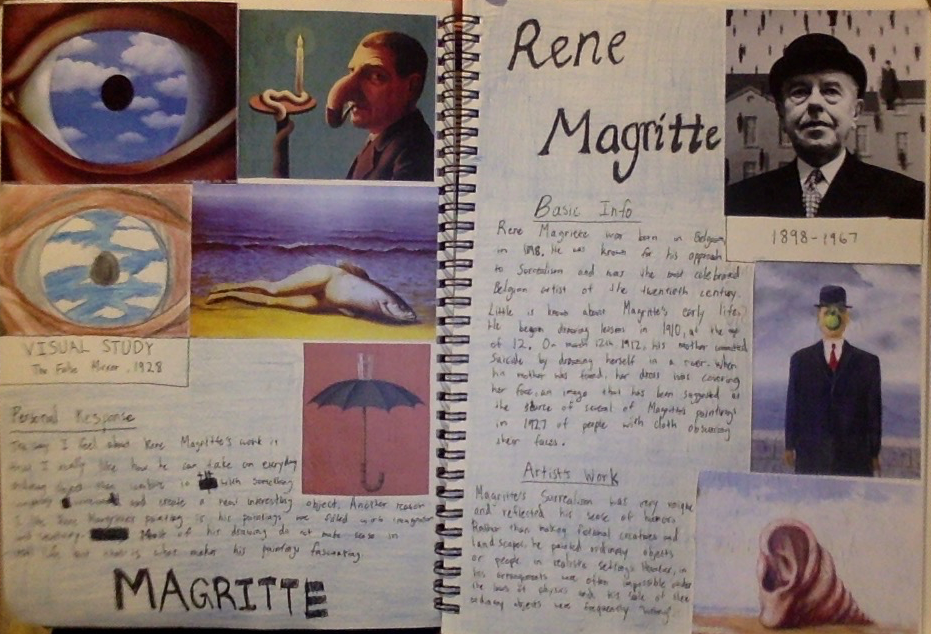
Remember, your writing should be in complete sentences and address 3 areas of their work: artist background, artist work, and personal response
This week, you can choose an up and coming illustrator to investigate from Colossol
OR
an illustrator we looked at in our illustration unit:
Yuko Shimizu
Shaun Tan
Molly Crabapple
Eric Drooker
Christoph Niemann
To find out some interesting background on your chosen illustrator, I would recommend googling, ''Artist name' interview' to find an interview about them.
Artist of the Week student examples below:
|
|
October 12-16
Due by Wednesday, October 14-Sketchbook assignment photos-Tumblr
On your Tumblr, post 3 photos of sketchbook assignments you feel most proud of that you've created so far.
Clear photos of your sketchbook pages should be edited properly before getting posted (cropped, straightened, added exposure if necessary)
Add a short description underneath each assignment photo post addressing questions below:
Due Tuesday, October 13-Observational drawing of MONEY
Materials: white paper(to place the bank note on top of), desk lamp, bank note
Drawing materials: pencil, pen, color pencils, watercolor
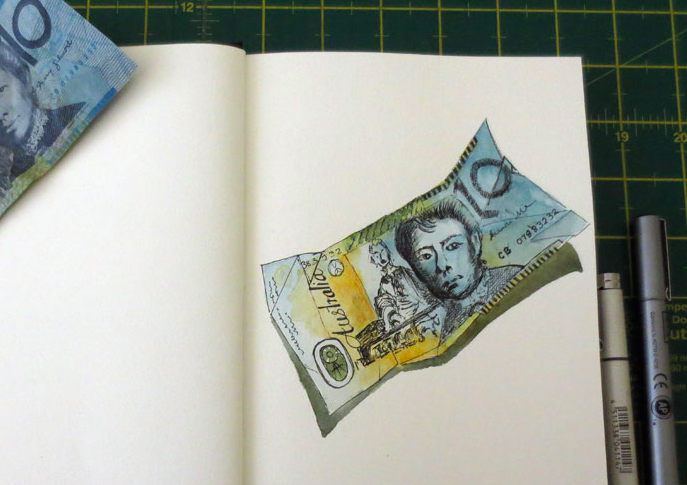
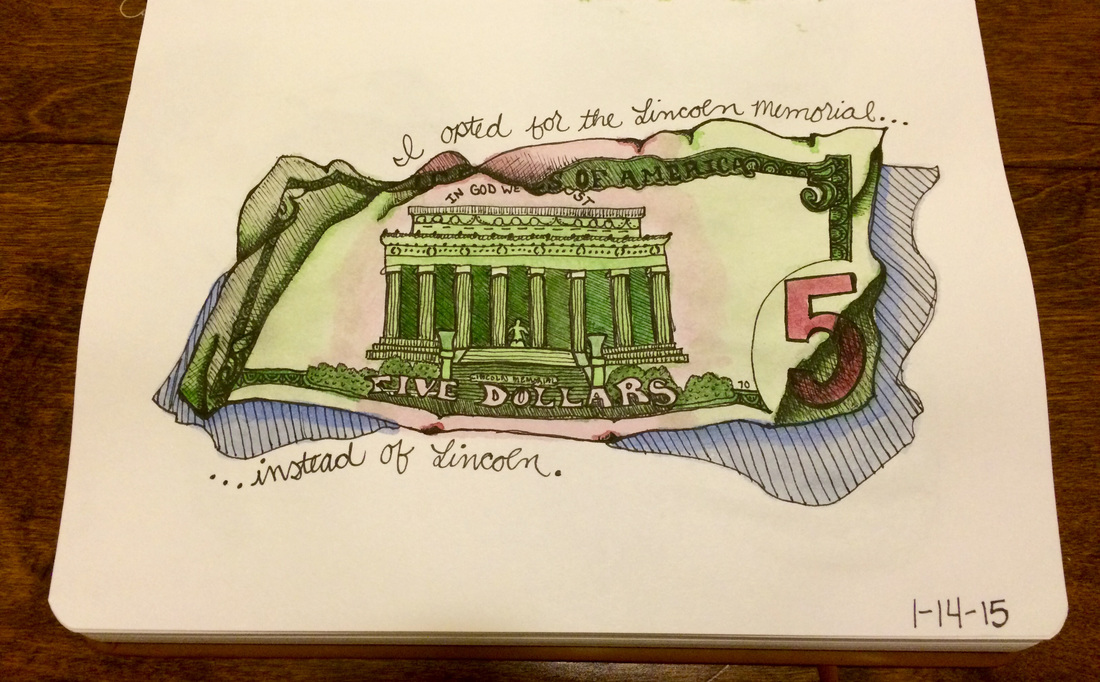
Directions: Take a paper bank note from any country (Chinese RMB, Euro, Vietnamese Dong etc.) and place it on top of a piece of white plain paper with the desk lamp as a light source to create shadows underneath the bank note. You cannot use coins...it should be a note.
Give the note some form by crunching it a bit. It should not be a flat note. This will create more interesting shadows underneath it, and challenge you with slight changes in the surface's angles. Spend your time drawing it in actual LIFE SIZE and noticing the interesting decorative details on the actual note...all these notes were designed by artists at some point in time! Look at the color scheme used in the note you've chosen. Try to recreate the note so it looks like it's real!
The example at the bottom top left here has excellent realistic shadows underneath it. It almost looks real!
Due by Wednesday, October 14-Sketchbook assignment photos-Tumblr
On your Tumblr, post 3 photos of sketchbook assignments you feel most proud of that you've created so far.
Clear photos of your sketchbook pages should be edited properly before getting posted (cropped, straightened, added exposure if necessary)
Add a short description underneath each assignment photo post addressing questions below:
- What was the challenge?
- Why are you proud of it?
- How does it show growth or improvement in your creative thinking/skills?
Due Tuesday, October 13-Observational drawing of MONEY
Materials: white paper(to place the bank note on top of), desk lamp, bank note
Drawing materials: pencil, pen, color pencils, watercolor
Directions: Take a paper bank note from any country (Chinese RMB, Euro, Vietnamese Dong etc.) and place it on top of a piece of white plain paper with the desk lamp as a light source to create shadows underneath the bank note. You cannot use coins...it should be a note.
Give the note some form by crunching it a bit. It should not be a flat note. This will create more interesting shadows underneath it, and challenge you with slight changes in the surface's angles. Spend your time drawing it in actual LIFE SIZE and noticing the interesting decorative details on the actual note...all these notes were designed by artists at some point in time! Look at the color scheme used in the note you've chosen. Try to recreate the note so it looks like it's real!
The example at the bottom top left here has excellent realistic shadows underneath it. It almost looks real!
|


|
October Holiday Creative Challenges
Choose 2 of the 4 challenges below to complete over the holiday in your sketchbook.
*If you decide to work with watercolor, make sure there is nothing important on the back of your sketchbook page.
If you choose #1 or #2, please take a photo of your sketch with the REAL scene or meal with it! As you all know, this is one of my favorite things to do!
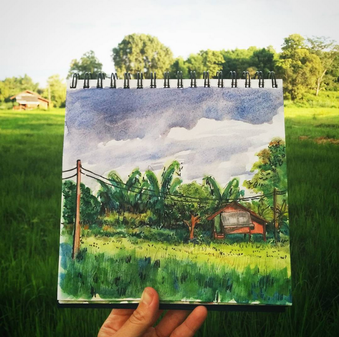
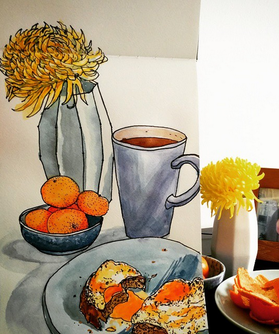
- 1. A 30-45 minute sketch and color of one of your meals-add values and/or color
- 2. A 30 minute-1 hour sketch of a landscape/cityscape view (try to go outside for this one!) Add values and/or color.
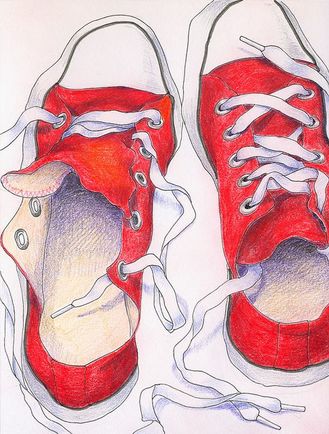
- 3. A detailed drawing of your shoes with pen and color pencil or watercolor.
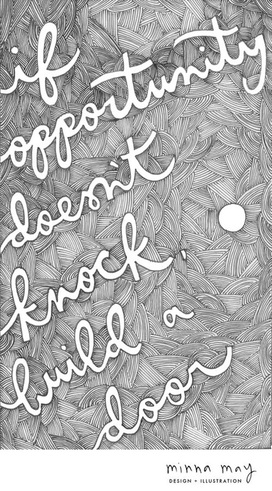
- 4. Write out a favorite, inspiring quote paying attention to your style of hand lettering using a variety of drawing media. Make it visually intriguing! Think about pattern and positive/negative space in the composition.
|
|
Due Monday, September 21
1.Tumblr Reflection of your Popcorn Drawings
-high quality photos of both your drawings (B&W and color pencil)
-written reflection of what you've learned
-Use the reflection question prompts to help guide your writing
2. 3 Story ideas for your flip book
Each story should have: a beginning, a transformation, movement and an end. Keep it simple!
Be ready to come into class and have a small group discussion about your story.
September 14-18
Due Tuesday, September 15
Artist of the week: Choose 1 of the Surrealist artists to investigate: Rene Magritte, Salvador Dali or Giorgio de Chirico
-2 butterfly pages in your sketchbook
-go to the Artist of the Week page for more information on this assignment
HW-Long Weekend Sept 3-6
Metamorphosis Assignment: You may use pencil or pen. It's up to you! This should be a full page in your sketchbook and take at least 1 focused hour of work. It is optional to add color.
1. Choose an everyday object around your house. Draw about 1/2 of your object realistically.
2. With the other half of the object you need to be inventive with the shape of the object. How might you turn the other half into something else? You need to get into the "Salvador Dali" mindset here...what bizarre nonsensical thing can you do with the object but maintaining a similar shape so its still recognizable? You may use photo references from google images to help you with the inventive half. Be CREATIVE! For some surreal inspiration, look at the work of photographer Stephen Mcmennamy who does this with photoshop.
Below is an example done by a college student (top half=realistic, bottom half=inventive)
August 31-Sept 2 (Short week)
Due Monday, August 31
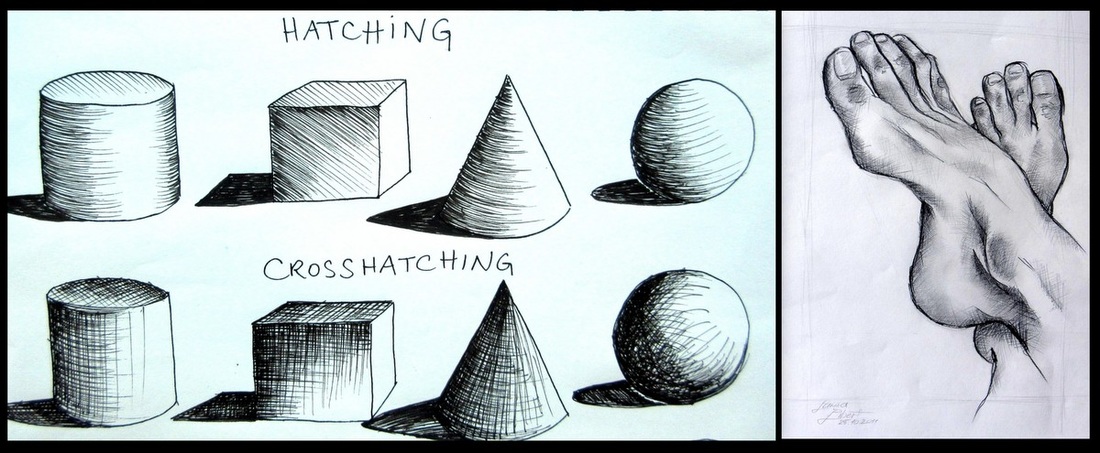
1. Hatching/Crosshatching worksheet should be finished before you begin (Use the sheet or draw out your own shapes in your sketchbook). You will start this in class. Only use fine tip pen for this. Stick it in your sketchbook when you're finished.
2. Draw your feet! Yes, your feet! Get comfortable and prop your feet up on the couch or table on the weekend. Listen to some of your favorite music and get into an art zone.
3. Sketch the outline of your feet on a full page in your sketchbook. Draw from your vantage point with pencil...do not work from a photo. If you want to be bold, I encourage you to skip the pencil, and just begin with fine tip black pen. Tommy Kane would agree!
4. Draw the details: nails, dry skin, blisters, skin wrinkles, hair? anything that you see on your feet and ankles.
5. Add shading with hatching and cross-hatching. Look at the work of Tommy Kane for inspiration. He's a cross-hatching genuis. I want to see your new cross-hatching skills get put to use!
August 24-28
Due Friday, August 28
-Reflection of Unit 1, Part 1 Composite Drawing (click for further details)
1. Take a photo of your project, and using some photo editing software (iphoto, photos, picasa etc) straighten it, crop out the background, adjust photo if necessary (exposure,contrast), then answer the reflection prompts in typed paragraph format. Print your photo and reflection and stick it in your sketchbook to fit on one page.
2. Post your photo on your Tumblr blog and add your reflection in the photo description.
Due Monday, August 24
-Artist Investigation-2 butterfly pages
Choose between these 3 artists: Gustave Courbet, Edouard Manet and Claude Monet
Go here to see some exemplar pages
August 17-21
Due Thursday, 8/20-1 Object 9 times
Divide your sketchbook page into 9 EQUAL segments-use a RULER
Choose a random object at home that has an interesting outer shape. Basically no rectangles or squares or circles...there should be some unique outer edge to this object.
Look at the object from a VARIETY of ANGLES (top, bottom, left, right, side) and with different lighting angles.
ZOOM IN and OUT.
Think about BALANCE between black and white and positive and negative space.
Due Monday, August 31
1. Hatching/Crosshatching worksheet should be finished before you begin (Use the sheet or draw out your own shapes in your sketchbook). You will start this in class. Only use fine tip pen for this. Stick it in your sketchbook when you're finished.
2. Draw your feet! Yes, your feet! Get comfortable and prop your feet up on the couch or table on the weekend. Listen to some of your favorite music and get into an art zone.
3. Sketch the outline of your feet on a full page in your sketchbook. Draw from your vantage point with pencil...do not work from a photo. If you want to be bold, I encourage you to skip the pencil, and just begin with fine tip black pen. Tommy Kane would agree!
4. Draw the details: nails, dry skin, blisters, skin wrinkles, hair? anything that you see on your feet and ankles.
5. Add shading with hatching and cross-hatching. Look at the work of Tommy Kane for inspiration. He's a cross-hatching genuis. I want to see your new cross-hatching skills get put to use!
August 24-28
Due Friday, August 28
-Reflection of Unit 1, Part 1 Composite Drawing (click for further details)
1. Take a photo of your project, and using some photo editing software (iphoto, photos, picasa etc) straighten it, crop out the background, adjust photo if necessary (exposure,contrast), then answer the reflection prompts in typed paragraph format. Print your photo and reflection and stick it in your sketchbook to fit on one page.
2. Post your photo on your Tumblr blog and add your reflection in the photo description.
Due Monday, August 24
-Artist Investigation-2 butterfly pages
Choose between these 3 artists: Gustave Courbet, Edouard Manet and Claude Monet
Go here to see some exemplar pages
August 17-21
Due Thursday, 8/20-1 Object 9 times
Divide your sketchbook page into 9 EQUAL segments-use a RULER
Choose a random object at home that has an interesting outer shape. Basically no rectangles or squares or circles...there should be some unique outer edge to this object.
Look at the object from a VARIETY of ANGLES (top, bottom, left, right, side) and with different lighting angles.
ZOOM IN and OUT.
Think about BALANCE between black and white and positive and negative space.
August 10-14
Due Wed, Aug 12-Portrait party at home: 1-2 pages-draw everyone at your house...including your pet. A mix of 1-5 minute drawings.
Extra Credit: if you get your family members to draw you too!
Due Friday, August 14
"Time Capsules"-1 page
Divide a sketchbook page into 4 quadrants
Draw:
1. your hand holding something special
2. a corner of a room
3. yourself using any technique
4. draw a complex object